NordVPN is our #1 rated VPN for torrenting. Their combination of price, security and p2p-frienly features is unmatched in the VPN industry.
In this guide you’ll learn:
- Why NordVPN is our top choice for torrenting securely
- Detailed Torrent setup guides for NordVPN
- Basic VPN configuration for P2P
- Using NordVPNs SOCKS5 proxy for torrents
- Torrent Client setup guides for NordVPN
- uTorrent/BitTorrent
- Vuze
- QBittorrent
How (and why) to use this guide
This is an comprehensive guide that will show you how to set up NordVPN for secure torrent downloads. Whether you’re using the VPN, the included SOCKS5 proxy (or both together), we’ve got you covered.
We also included proxy settings for multiple torrent clients including:
- uTorrent/BitTorrent
- Vuze
- QBittorrent
- Flud
Using NordVPN for Torrents: Do’s & Don’ts
NordVPN is an excellent torrent privacy tool, but it needs to be configured and used properly. Don’t just assume you can click a button and your torrents instantly become invisible. We’ve laid out some best-practices to help keep maintain a high level of privacy.
Do
- Use the kill-switch. Sooner or later a VPN connection will fail.
- Choose a p2p-friendly server: Stick to Switzerland, Netherlands, Spain, Mexico and avoid servers in the UK, USA, Australia, Germany and Canada when using bittorrent. More info?
- Consider the VPN the most secure option: The VPN is more stable and secure than NordVPNs proxy servers and has incredibly strong encryption (the proxy doesn’t). Unless you’re sure you don’t need encryption, a VPN is usually better than a proxy.
- Verify your setup: It’s important to check your torrent IP address and make sure peers aren’t seeing your real location.
Don’t
- Don’t Use HTTP Proxies: Only SOCKS proxies can handle p2p connections. If you use a HTTP(S) proxy it will only work for tracker communications (not peers) and your real IP address will still be visible in torrent swarms.
- Don’t forget to turn on the VPN before torrenting: (Obviously)
- Don’t force in-client encryption when using a VPN: Most torrent clients have an option for weak encryption of peer connections. But requiring encryption just limits your peers and a VPNs encryption is much stronger. Just set in-client encryption to ‘Enabled’ and let your VPN handle the security.
How to use NordVPN for Torrenting
In this section we’ll cover the recommended settings and steps to download torrents using NordVPN’s desktop (or mobile) application.
Topics discussed:
- The Basics (app overview)
- Recommended Settings
- Security, Encryption & Leaks
- Optimizing Speed
Using the VPN for Torrents: Basics
Once properly configured, it’s incredibly easy to use NordVPN’s app with your favorite torrent client. This is literally all you have to do:
- Open the VPN software
- Choose a server location (we recommend their p2p-optimized servers)
- Click ‘Connect’
- Start torrenting
That’s it. Just make sure you never open your torrent client until the VPN connection is already active (or you risk exposing your real IP address).
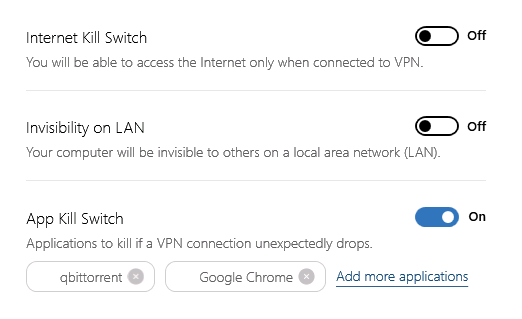
Recommended App Settings
These are the settings we recommend in order to maximize your privacy on p2p networks:
Kill Switch: You should turn on either the App kill-switch (add your torrent client to the kill list) or Internet-level kill switch (stops all internet activity).
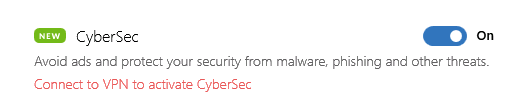
Cyber-Sec (Optional): We recommend activating the Cybersec option in Settings > General. It is a threat-filtering tool that can block ads, phishing redirects and malware (something sketchier torrent sites are littered with).
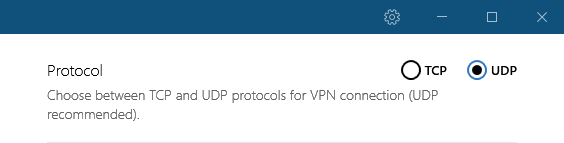
Protocol: Use UDP for the fastest speeds when torrenting. TCP is much slower because it requires packets to be sent and validated sequentially. You can change this setting in Settings > Advanced > Protocol.
Security, Encryption & Leaks
NordVPN’s software comes with built-in leak protection to prevent the most common ways identifying information can be leaked while using a vpn. Nordvpn has:
- DNS leak protection (Automatic)
- IPv6 leak protection (Automatic)
- IPv4 leak protection (Optional via kill-switch)
Encryption: All connections from the desktop app use OpenVPN with 256-bit AES encryption (considered unbreakable, even by security agencies).
Recommended Torrent Client Settings
In order to optimize your speeds and peer availability while using a VPN, you may need to adjust a few options inside your torrent client.
1: Set protocol encryption to ‘Enabled’ – Most major torrent software has a built-in encryption option for peer-to-peer transmissions. There are usually 3 settings: disabled, enabled, or forced. You want to choose ‘Enabled’ which will give you more available peers than the other two options. Let the VPN handle your encryption. More info…
More Info: Torrent encryption guide
2: Disable uTP protocol: uTorrent/BitTorrent client has a bandwidth-management option built in called uTP. We recommend you disable this (it’s basically self-throttling).
Using the SOCKS5 proxy for torrents
NordVPN has more SOCKS proxy locations than any other VPN provider, and many of those include p2p-optimized servers. SOCKS proxy access is included with every NordVPN plan.
Why use SOCKS? – NordVPN’s SOCKS proxy changes your public torrent ip address without using any encryption, so speeds may be faster than using a VPN. It also allows your torrent activity to be routed separately from the rest of your internet traffic. VPN or Proxy: which to choose?
Who shouldn’t use SOCKS: If you suspect your ISP is blocking/throttling/monitoring torrents are you live in a country where all torrenting is illegal, you should use a VPN because you need the 256-bit encryption that keeps your ISP from seeing your torrent activity.
Be Aware: proxies are tricky and sometimes unreliable as your sole torrent privacy method. If you’re confident you know how to configure and test your setup, go ahead. Most users will be better off using the VPN.
Get your SOCKS credentials
Before you can setup the proxy in your torrent client, you’ll need 4 pieces of information:
- Server Address: (variable, see below)
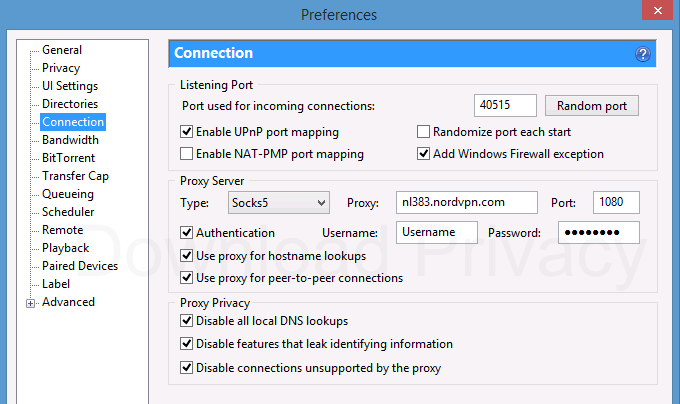
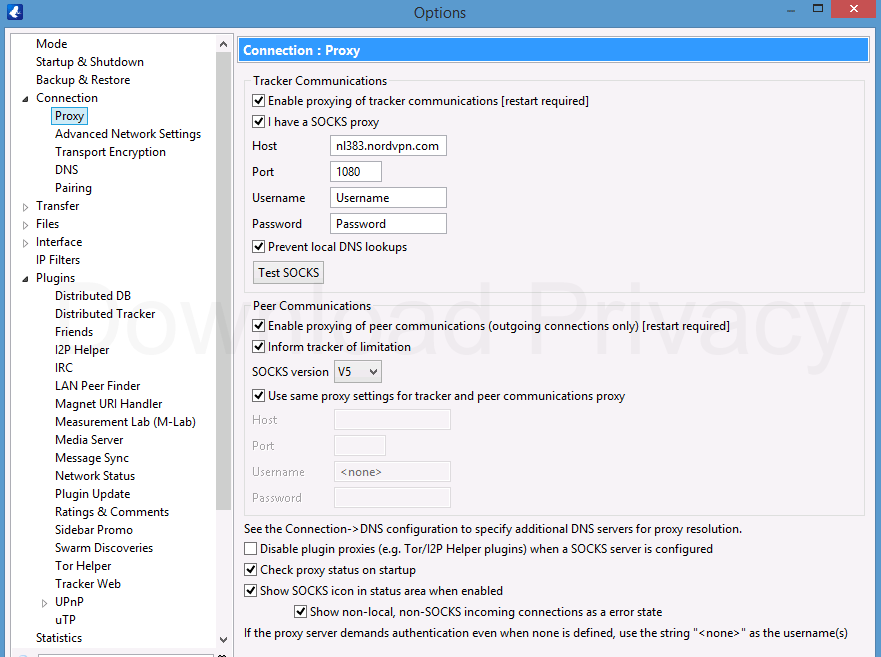
- Port Number: 1080
- Username: same as VPN
- Password: same as VPN
The proxy login credentials are the same as your VPN account and all of NordVPN’s SOCKS proxy servers use port 1080. But you’ll need to choose a specific server location using their tool.
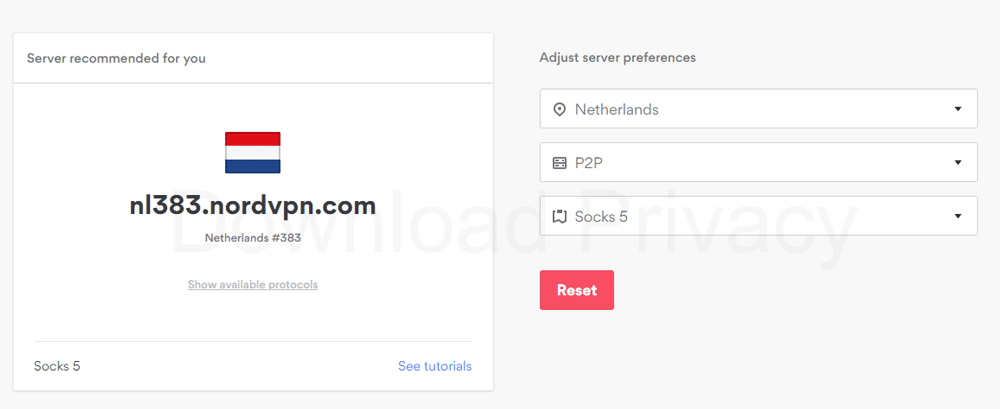
For this tutorial, we’ll use the server shown above (nl383.nordvpn.com).
Configure your torrent client
We recommend you only use NordVPN’s SOCKS proxy with the following torrent clients:
- uTorrent/BitTorrent
- Vuze
- Deluge
- QBittorrent
This is because other torrent clients have proxy leaks and may route peer communications insecurely (exposing your real IP address).
Here are the optimal settings for each torrent client:
Note: Match your settings to those shown here but make sure you insert your own username/password and server address.
To access the proxy settings in uTorrent go to: Menu > Preferences > Connection
To access proxy settings in Vuze, go to: Menu > Tools > Options > Connection > Proxy
To access proxy settings in Deluge, go to: Menu > Edit > Preferences > Proxy
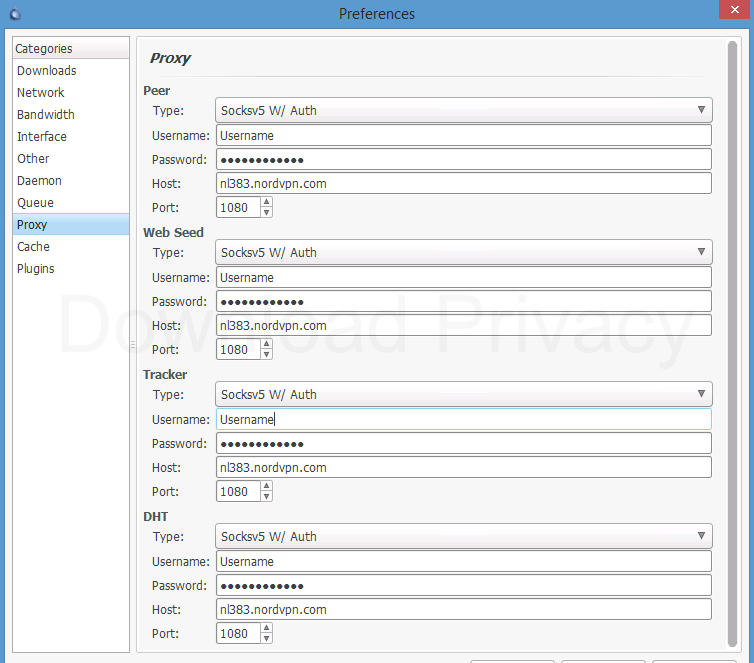
Note: in Deluge you have to (get to?) configure each connection type individually, so in theory you could use the proxy for only certain things. At a bare minimum you want to use the SOCKS proxy for Peer and DHT connections. You could use an HTTP proxy for Tracker connections if you want.
To access qBittorrent’s proxy settings, go to: Tools > Options > Connection > Proxy
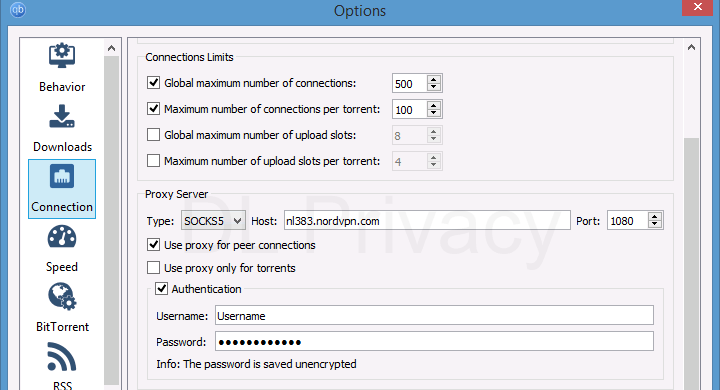
Important Settings:
- Use proxy for peer connections: Enabled
- Use Proxy only for torrents: disabled
- Authentication: Enabled
Check your VPN/Proxy setup (important!)
Once you’ve got your VPN and/or proxy set up, it’s important to check that everything is working as excepted. After all, mistakes happen and VPN apps can be glitchy on occasion (like showing a false-positive ‘connected’ status!!).
You’ll do this using an IP-address tracking torrent.
How to do it: Follow our step by step guide on how to check your torrent IP address.
Summary
If you’ve made it this far, you should have a good understanding of how to setup NordVPN for torrenting using the VPN or included SOCKS proxy.
Here are the key points to remember:
- Using the VPN is the best option for most people. The NordVPN’s proxy may deliver slightly faster speeds but it has no encryption and can easily be misconfigured. Worse, some torrent clients occasionally ignore the proxy settings.
- If using the VPN, make sure to turn on the kill-switch.
- Always connect to the VPN before starting a torrent
- Set in-client encryption to ‘enabled’ but not ‘forced’ to get highest peer availability (and speeds).
- Test your setup using a tracking torrent!