
Deluge is one of the most popular light-weight torrent clients in the world. It’s beloved because it’s open-source, ad-free, and extremely flexible. It can even be operated remotely as a seedbox. Yes, Deluge is extremely powerful, but out of the box it has the same security vulnerabilities as any other Torrent software.
In this guide, we’ll show you most common ways your true identity is leaked every time you download torrents unprotected. Then, we’ll show you how to fix them once and for all.
If you use a torrent client other than Deluge, we also have guides on how to use uTorrent or Vuze anonymously.
Ready? Let’s do it.
TORRENT SECURITY VULNERABILITES
There are 2 primary ways your Deluge torrent activity can become public.
- Your IP address is publicly visible to every peer in every torrent swarm you join.
- Your ISP (Internet Service Provider) easily monitor your activity and see the files you download
Leak #1: Your IP address is visible to everyone
Your IP address is a unique internet address that is assigned to you by your internet provider, and can be traced directly back to you. To see your current IP address, visit IPvanish’s Check IP Tool and look at the bar at the top of the page.
If you don’t use a tool to hide your true IP address, this number will be visible to every peer in your torrent swarm. These swarms reach 1000’s or even tens of thousands in number!
Here’s a quick demonstration of how easy it is to see your peers IP addresses:
- Open Deluge
- Select any active torrent
- Click on the ‘Peers Tab’
- You can now see the IP address for every peer you’re currently connected to.
Here’s a peer list for an open-source linux torrent…
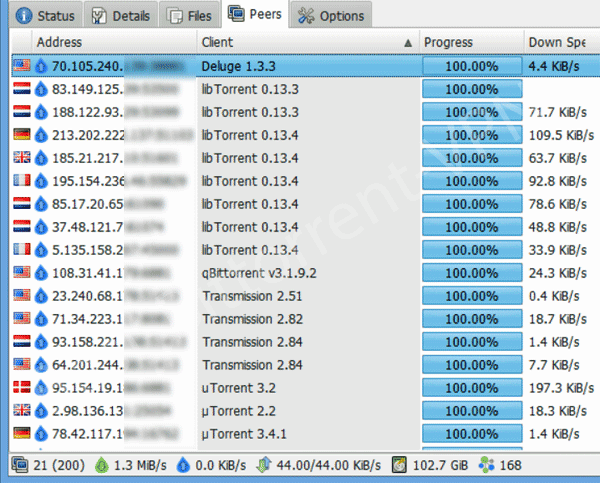
Deluge Peer List (with IP addresses) from a Linux torrent
As you can see, it’s extremely easy for someone to monitor and identify individual torrent users, just by connecting to multiple swarms at once and logging the IP addresses of the swarm members.
Luckily, we will show you how to get an anonymous, untraceable IP address later in this article!
Ok that brings us to leak #2 which is…
Leak #2: Your ISP can monitor and throttle your torrent activity
All data transmitted to/from your computer must go through your Internet Provider’s servers. Unless you’re encrypting your traffic by using a Virtual Private Network service (which will teach you how to do shortly), they can see everything you do online.
Your ISP can easily see:
- That you’re using bittorrent
- What files you’re uploading/downloading
- How much data you’ve transferred
- What websites you visit
Not only do ISP’s monitor your activity, they also usually keep logs of your online history as well.
In fact, data retention laws in the European Union and United States require ISP’s to keep connection logs for a minimum of 6 months! (And many ISP’s keep them longer than that).
TWO TOOLS FOR ANONYMOUS TORRENTING: (VPN & PROXY)
There are two tools that can be used to hide your torrent activity:
- VPN (Virtual Private Network)
- Proxy (must be SOCKS5)
Though they have similarities, each has it’s own advantages and disadvantages. To get the best of both worlds (and dramatically increase your security) you can actually use both simultaneously.
Both a VPN and Proxy route your traffic through a 3rd party server, which hides your true IP address and replaces it with the IP address of the server you’re connected to. This (anonymous) IP address will be the one that is visible to your torrent peers.
If you use a proxy or VPN that doesn’t keep logs, there is no traceable connection between your true IP address and your new (anonymous) IP address.
Ok let’s look at the differences between a Proxy and VPN…
A VPN:
- Uses extremely strong encryption (secure)
- Routes traffic through a server location you choose
- Protects your entire internet connection
- Hide your IP address from torrent peers and websites
SOCKS5 Proxy:
- No encryption
- Usually a server located in the Netherlands
- Protects 1 app (your torrent client in this case)
- Hide your IP address from torrent peers
- Doesn’t protect your web browsing
So the two most important differences between a proxy and VPN are:
Difference #1 – A Proxy server doesn’t encrypt your data:
Encryption is like a password protected tunnel wrapped around all incoming/outgoing data. If you don’t have the key (password) you can’t read the data. This prevents your ISP from monitoring your downloads or even seeing that you’re using bittorrent.
Encryption can also prevent your ISP from throttling (slowing down) your torrent traffic, as well as video streaming services like Netflix and Youtube. Learn more about how to block torrent throttling in this guide.
The good news is that most popular VPN clients (including Deluge) have the ability to encrypt your torrent traffic for you, even if you use an unencrypted proxy server to hide your IP address. We’ll talk about this feature a bit later on.
Difference #2 – A proxy tunnel routes traffic for just torrents, a VPN tunnel routes everything the same:
When you connect to a VPN, it takes over your entire internet connection. Every bit of data you send and receive will now go through the VPN tunnel. This means that your torrents, web browsing, video streaming, etc… will all be going through the same data tunnel and use the same IP address (assigned by the VPN).
A proxy is a little different. A proxy protects routes 1 program or protocol separately from the rest. You could use a proxy server for torrents, or you could use it for you web browser, or any other program with proxy support.
Whichever program is using the proxy will route it’s data through the proxy tunnel. The data for every other program will be routed normally. This allows your torrent IP address unique.
Pro-tip: If you want the best of both worlds, you can use a proxy server for torrents, inside a VPN tunnel, which gives you the best of both worlds. Encryption + Separate torrent routing.
For more information on the subject, read our Proxy vs. VPN for torrents guide.
HOW TO USE DELUGE ANONYMOUSLY (VPN METHOD)
A VPN is the easiest way to change your Deluge torrent IP address and encrypt your torrent traffic. We only recommend VPN providers that have an easy-to-use desktop application that makes connecting to a VPN server as easy as 1-click.
Our top recommended VPN’s for Deluge are:
- Private Internet Access – $3.49/month (2 year plan)
- IPvanish – $6.49/month (1 year plan)
- NordVPN – $2.99/month (special offer)
For most users, Private Internet Access is an excellent choice. They were named our ‘Best Torrent VPN‘ 3 years in a row and provide excellent, no-logs VPN service at a lower price than virtually any other company.
PIA also includes proxy and VPN service in every package instead of having to purchase them separately.
How to use a VPN with Deluge
Hiding your Deluge torrents with a VPN is extremely easy:
- Connect to a VPN server (preferably in a torrent friendly country like Switzerland, Netherlands, or Canada)
- Open Deluge
- Torrent!
We’ll show you step by step how to connect using Private Internet Access’s desktop VPN client. Any other VPN software should be just as easy.
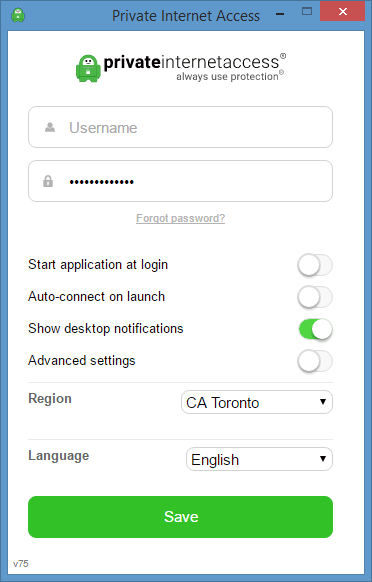
Step #1 – Open Private Internet Access
When you open PIA for the first time after installing it, you will be prompted to enter your username/password that were emailed to you when you subscribed. This info will be saved by the software so you don’t have to login every time.
You can choose to have PIA load with windows when you start your computer. You can also have it auto-connect when loaded. This way your connection will always be anonymous.
From the “Region” dropdown, you can select the default server location. We’ve chosen Toronto, Canada.
Step #2 – Connect to a server
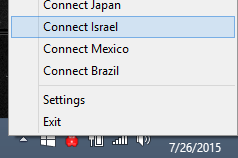
In your system tray (lower right corner of windows taskbar) you should see a PIA logo icon (Figure ‘A). It will be red when disconnected, and green when connected.
If you don’t see the icon (and PIA is open) then
- click the ‘show hidden icons’ triangle (figure ‘B’)
- Click ‘Customize…”
- Find pia_Tray.exe
- Choose ‘Show icon and notifications’ from the menu
- Hit OK.
Once you can see the red PIA try icon, it’s extremely easy to connect.
- Right click the icon
- This will bring up a menu of all PIA servers
- Click the server you want to connect to
- Wait for PIA icon to turn green
- You’re Connected!
Once connected, you can hover your cursor over the PIA icon to display your current (anonymous) IP address.
Step #3 – Your torrents are now anonymous. Use Deluge as Normal.
Once connected to a VPN server, you will be assigned a new IP address which will appear publicly to your Deluge peers. All data you transmit (Via deluge or any other application) will be automatically encrypted by the VPN and unreadable by your Internet Provider.
Using a proxy with Deluge requires a bit more configuration to set it up, but it does have several advantages over a VPN.
Advantages of a Proxy over VPN:
- Often faster speeds
- Separate IP address just for torrents
- If Proxy connection fails, your true IP is not exposed because Deluge can only connect through proxy.
The one major disadvantage of a Proxy is it doesn’t encrypt your data like a VPN. Deluge does offer a built-in encryption function that can be used with a proxy, but it has some tradeoffs which we’ll discuss soon.
If you want the best of both worlds, use a Proxy and VPN simultaneously. Visit Private Internet Access with this link to get proxy and VPN service together for only $3.33/month (1 year subscription).
When choosing a proxy service for torrents, make sure you have these three critical features:
- SOCKS Proxy Protocol, not HTTP (HTTP proxies can leak identifying information)
- ‘No-Logs’ policy, to make sure your torrents are untraceable
- Torrents Specifically Allowed – Don’t download torrents on a proxy that bans them. It won’t end well.
Our 4 Favorite Torrent Proxy Providers: (All are ‘No-Logs’ and torrent-friendly)
- Private Internet Access (VPN + Proxy service included in every package)
- IPVanish – Socks5 + VPN included in every plan.
- Torguard – (The most server locations. 5+ Countries)
- Proxy.sh – (Like PIA, they include Proxy service free with every VPN Purchase)
HOW TO SET UP DELUGE WITH A SOCKS5 PROXY (STEP-BY-STEP)
We’re going to be doing this guide using a Proxy Server from Private Internet Access (mostly because they don’t have any step-by-step torrent guides for their proxy service, while most the other services do).
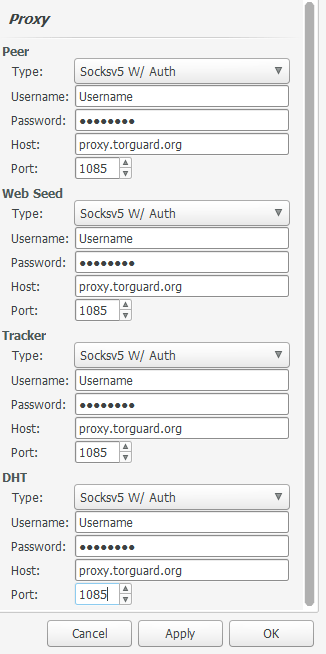
You can follow these exact same steps for the other providers. Here’s the info you need for each (though they also have their own instructions available from your account):
Proxy settings for popular services
| Torguard | Proxy.sh | BTGuard | |
| Server Address | proxy.torguard.org | ext-eu.proxy.sh | proxy.btguard.com |
| Port Number | 1085 or 1090 | 1080 | 1025 |
If you DO subscribe to Private Internet Access (Important):
The login/password for the proxy server is not the same as your VPN login/password. You have to randomly generate a proxy password from inside your PIA account panel (we’ll show you). Make sure you don’t skip that step!
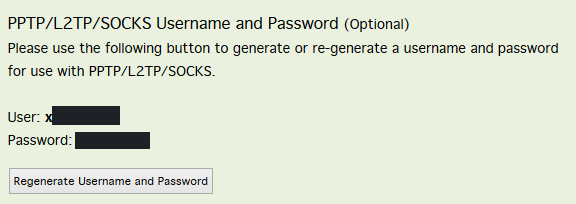
To get your PIA Proxy Login/Password
- Login into your Private Internet Access account control panel
- Click the ‘Generate Username and Password’ button
- Keep the page open so you can copy and paste them in step 2 below.
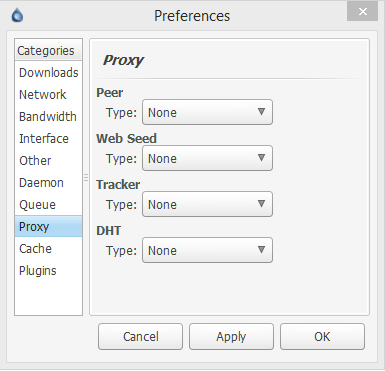
Deluge Proxy Setup Step #1 – Go to Deluge Proxy Settings
- Open Deluge
- Go to the preferences menu: Edit > Preferences (Ctrl+P)
- Click the ‘Proxy’ Tab
It Should look like this:
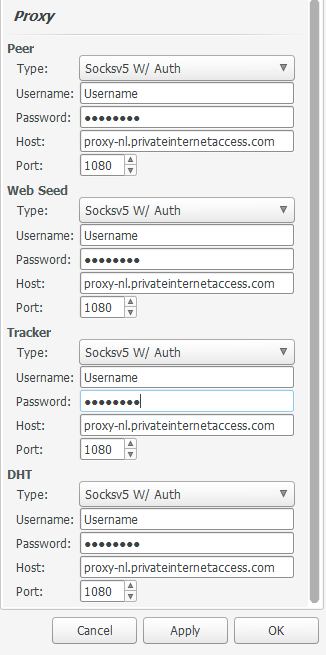
Step #2 – Configure the Proxy
Do the following steps for each proxy type (Peer, web seed, tracker, and DHT). If you don’t do it for all of them, you could accidentally leak your true IP address via the unproxied method.
- Select Type = Socksv5 W/ Auth (Socks5 proxy with a username/password)
- Enter Username/password provided by your proxy service
- Enter your proxy host address (provided by your service, or see the list above)
- Enter correct port # (see settings above, or consult your provider)
- Click ‘OK’
Step #3 – Test Your Settings
It’s always best to restart Deluge after applying new proxy settings. Then open up a torrent (preferably one with lots of seeds) and verify that it is downloading.
If everything is working properly – Congratulations, you’re all set! Your proxy is properly configured.
If you can’t connect to peers – You probably got a configuration detail wrong. Double check your host, login details, and port to make sure they are correct. Also make sure to read any errors that show up in the left frame of your main screen (under ‘Trackers’)
USING ENCRYPTION WITH DELUGE (OPTIONAL)
Deluge offers built-in encryption for people that aren’t running a VPN. The advantage of encryption is it blocks 3rd parties (like your ISP) from reading your traffic or seeing that you’re downloading torrents. This also stops them from throttling your torrents and may result in faster speeds.
The downside of using Deluge’s built-in encryption (as opposed to VPN encryption) is that it only works with other peers that have encryption enabled as well, so depending on your encryption settings, it could dramatically reduce your number of available peers, which might be an issue for poorly seeded torrents.
My recommendation would be to start with Encryption set to ‘Forced’ and if you can’t reach enough peers, you can always change it to ‘Enabled’ (available but not required).
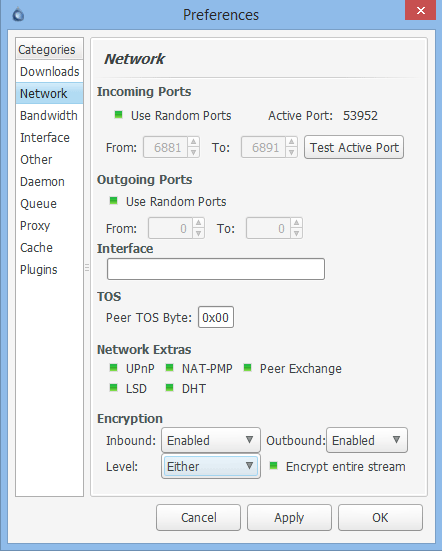
Here’s how to set up encryption…
- Open Deluge
- Go to the Preferences menu: Menu > Edit > Preferences
- Go to the ‘Network’ Tab
- Look for the ‘Encryption’ section at the bottom
For Enabled (but optional) Encryption, choose these settings:
These settings will make encrypt connections with other peers that have Encryption enabled, but will still connect to unencrypted peers. You can still connect to every peer in the swarm, but not all peer-peer connections will be encrypted.
For Forced Encryption (Maximum Security, all connections encrypted) choose these settings:
These settings force Deluge to only connect to other peer that have full-stream encryption enabled as well. This setting has the highest security (because all data you transfer will be encrypted) but it may dramatically reduce the number of available peers, which can cause slow downloads (or even make it impossible to download a torrent with no encrypted peers).

CONCLUSION AND OTHER RESOURCES
Thanks so much for reading our How to Guide for Anonymous Deluge. If you’ve followed these steps your torrents should be very anonymous. Please make sure to torrent responsibly.
Here are some more articles you might find useful:
How to use uTorrent anonymously
How to use Vuze anonymously
How to torrent anonymously: Android Edition
How to use a VPN Kill-Switch to protect against VPN disconnects
Understanding VPN Logs
Proxy vs. VPN for torrents
If you found this guide helpful, please share it (or just our site) with a friend. You can use the social ‘share-bar’ at the left of the screen, or just tell them about the site. Thanks!